

The Log Panel displays all the contacts in your log.
QSOs are entered into your log by pressing the Log QSO Button aftert a Look Up.
All the information in your DX or Contest Panel for that QSO will be entered into the log and every field in the Log panel is editable.
You can also use the File menu Speed Log Dialog to enter existing paper logs, or the File menu Import ADIF command to import ADIF files from other logging programs.
MacLoggerDX has built-in Confirmation commands for LoTW and eQSL but confirmation ADIF files from LoTW, eQSL and QRZ Logbook can also be used to confirm existing QSOs by selecting them with the Log menu Confirm QSOs with ADIF File... command. Instead of being imported, each QSO in the confirmation ADIF file is used to mark the matching QSO in your log with a stamp matching the service i.e. LoTW, eQSL, QRZ Logbook etc. that created the confirmation ADIF file.
The font of the Log display can be changed by clicking on the log text and then selecting Font/Show Fonts from the Edit menu. Note: Some fonts like Monaco do not have bold or italic variants. Menlo is a fixed-width font with stroked zeroes, bold and italic variants.
When you first run MacLoggerDX it will choose a default Log Files Folder path (MLDX_Logs) in your Documents folder but you can use the File Menu item New Log File... to create any number of logs anywhere on any volume. It is a good idea to create new log files under your Documents folder so that your log data will be backed up when you back up your other data. To switch the current log you want to use, select it from the MacLoggerDX File menu - Open Log File… or Open Recent....
Don't forget to back up your log file every day - just as you would any other important data on your computer. If you want to make a backup copy of your log, select Show Log or Compress Log from the File Menu. This will highlight your log file or compressed log .zip file in the Finder and you can then drag it onto a backup volume or thumb drive.
Most of the column headings are self explanatory, the DXCC column shows the unique DXCC identifier number assigned by ADIF convention to your DX contact. All DXCC entities have a date range during which they are/were valid. If your QSO start time is during that time period the QSO will be counted as valid towards your DXCC, if not the QSO will be greyed out and the QSO time will be displayed in italics. The Call sign will be displayed in bold italics if the station operator is a registered MacLoggerDX user.
Entries
displayed in Grey have either
their QSL Sent or QSL Received
fields set to I for Ignore or
their DXCC ID is zero or the QSO was logged on
a date where that DXCC ID was not valid.
Entries
displayed in Green have received
QSLs and are Confirmed.
Entries
displayed in Red have sent QSLs
but not Received QSLs and are not yet Confirmed.
Entries displayed in Black have neither sent
nor received QSLs.
The Log prefs allow you to change the default colors for
Confirmed and Un-Confirmed QSOs.
To Add missing DXCC and Band Data...
If
you have logged a call with incorrect DXCC name or
numeric value - set the DXCC numeric ID to 0, clear the DXCC
Country field to blank and then Update Selected Log Entries
with the new call and the new DXCC and DXCC Country will be
entered automatically. This will never overwrite existing data -
only fill in empty string or zeroed numeric fields.
Please
note that MacLoggerDX maintains a mapping to current DXCC
entities - if your log contains a QSO with a DXCC entity
which has changed or been deleted in the past or a special event
prefix which is only valid for a short period of time, you may
have to edit the DXCC name and numeric fields manually.
The TX
Frequency is displayed in Bold if
it is different from the RX Frequency (split).
The
Time On is displayed in Bold
if the time between Time On and Time Off is more than 20 minutes
(rag-chew).
The Time On and Time Off are displayed in Italics (DXCC in Red) if they are outside the valid dates for that DXCC ID.
Note: Some fonts like Monaco do not have bold or italic variants. Menlo is a fixed-width font with stroked zeroes, bold and italic variants.
For the purposes of Awards tracking and display color coding - any text at all in the QSL Received field other than N OR I indicates that a QSL has been received or is Confirmed. Any text at all in the QSL Sent field other than N or I indicates that a QSL has been sent.
MacLoggerDX tries to set the QSO start time and the finish time automatically - you can override the start time by doing another lookup or using the Set Time On menu command or the Time On button - you can override the finish time by using the Set Time Off menu command or the Time Off button.
The data can be sorted by clicking in the column heading. The column sorted by is highlighted or checked. Clicking on it a second time will reverse the order of the sort. Dragging column headings will allow you to rearrange their order. (column order is saved in your preferences). You can make the column wider by dragging the column header vertical margins, double-click the line between any two column headers and the column’s width will be automatically set.
By default the sort order will revert to historical (Time On) when you start MacLoggerDX, but you can change this to persist your chosen sort order between sessions with the Terminal command $ defaults write com.dogparksoftware.MacLoggerDX persist_qso_order -bool YES.
You can choose which columns to display in the Log Prefs.
The Log table header will show you the number of selected QSOs increasing each time.
If you make a mistake and Command-Click the wrong one - Command-Click it again and it will be removed from the selected list.
As long as you leave the Command key depressed you will not cancel the selection.
Export or modify the selected QSOs, (Optionally press the Selected button to view just the selected QSOs).
Control Clicking (or right clicking) on a Log panel row will display a contextual menu.

Display
displays the selected QSO details in the DX panel.
Call
History searches for
and displays all QSOs with the call sign selected.
Tag
QSL Sent stamps the QSL Sent field with CardC:YYYYMMDD.
Tag QSL Received stamps the QSL Received field with CardC:YYYYMMDD. (Exported in ADIF as QSL_RCVD and QSLRDATE).
Both the Log Panel and The Spots panel have contextual menus with Open Note File menu items.
This will open in TextEdit an existing Note File named after the logged QSO or Spot Call Sign or create a new file if one doesn’t already exist and enter some basic info like call sign, date and time etc. A small dot will appear after the call sign in the Spots and Log tables if a note exists for that call.
You can enter or paste any text you want into this file and also convert it to Rich Text in the TextEdit Format menu for styled text and/or pasted pictures etc.
The Note files are stored in the ~/Documents/MLDX_Logs/note_files/ folder based on Spot or QSO call sign, for example VE3VRW notes.txt.
These are the same files opened from either contextual menu, so if you create a file for VE3VRW in the Cluster panel it will have the same content when you look it up later in the Log panel.
You can
move the note_files folder to DropBox or other
Cloud service if you replace it with an alias (v6.21+ and
macOS10.10+).
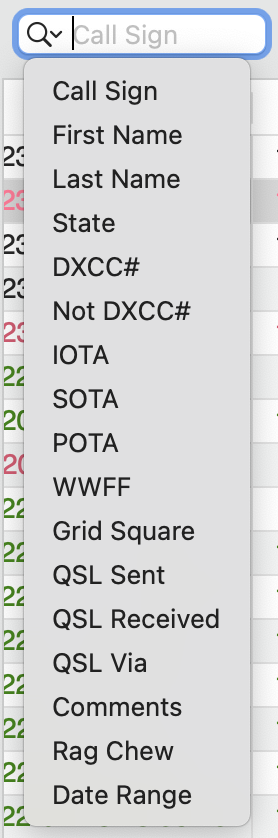
The Call
Sign Search edit field will filter out the QSO's that do
not have the text you enter in their call sign.
For example you could type in "XE2" and get only the XE2 QSO's.
This field can search the Log by Call Sign, First Name, Last Name, State, DXCC#, IOTA, POTA, WWFF, Grid Square, QSL Sent, QSL Received, QSL Via, Comments, Rag Chew (QSOs longer than 20 minutes default or entered minutes) and Date Range.
The
Band Search edit field will filter out the QSO's that do
not have the text you enter in their band rx.
For example you could type in "20M" and get only the 20 Meter
QSO's. Entering SAT or EME into the Band search panel will also
search for QSOs which have the Satellite field set to a
Satellite name or EME. (When you log an EME contact log it as
you would any other contact but set the Satellite
field to EME).
The
Mode Search edit field will filter out the QSO's that do
not belong to that mode group. Any phone mode entered like AM
will show all phone contacts Any digital mode entered like DIGI
will show all digital mode contacts. Entering PSK
will show all PSK31 contacts.
If the
Use Mode Groups check box is not checked in the
Log Prefs then the Mode Search edit
field will filter out the QSO's whose Mode
field does not contain that specific mode.
The Country Search edit field will filter out the QSO's
that do not have the text you enter in their DXCC Country.
For example you could type in "Canada" and get only the VE/VA
QSO's.
This field can search the Log by Country, First Name, Last Name, State, DXCC#, QSL Sent, QSL Received, QSL Via, Comments and My Call.
The First Name, Last Name, QSL Sent, QSL Received, QSL Via, Comments and Date Range search criteria are selected with the drop down triangles in the Call and Country Search fields.
The QSL popup will select QSO's based on the QSL Sent and Received fields - All, Confirmed, Unconfirmed, No QSL Sent, No eQSL Received, No LoTW Received, No CardC Received.
The
Reload Button will reload the current log from
disk.
(Only needed when 2 or more copies of MacLoggerDX are sharing
the same log).
The Display Button (command-D) will Display the QSO in the DX or Contest Panel.
The Delete Button will delete the selected QSOs from your log. This action can be Undone from the Edit Menu.
Each field can be edited by double-clicking in it, editing the data in the Edit field and then pressing <return> or tabbing out of that field. The change is instantly saved to your log. The Time On and Time Off fields must be edited with a valid date and time in the format YYYY-MM-DD hh:mm:ss, in UTC.
Selecting the Update Selected Log Entries command from the Log Menu will perform an Internet Call Book look up for all selected log entries and add the found data to any blank fields in the entry, one at a time. This will ONLY update empty fields (or "0" in the case of DXCC), it will never overwrite existing data. MacLoggerDX will post an alert if you try to process more than 250 QSOs at once but the actual number that are practical to update at one time will depend on your Mac, OS version, your Call Book, your Internet Connection speed and the number of look ups previously cached. Keep in mind that some Call Book servers will throttle their response if you overload them.
Selecting the Select Duplicate QSO's command from the Log Menu will select all duplicate entries, after checking them you can delete them.
Selecting
the Change Selected Log Entries command from the Log
Menu will activate a dialog that will Remove,
Overwrite, or Append text to
checked fields in the QSOs selected in your Log.
This dialog can also be activated by control-clicking selected
QSOs in the log panel.

To
match, the two QSO records (yours and the other station's) must
have:
• Call of each QSO matches own call of the other (including
portable identifiers)
• The modes are in the same mode group (e.g., SSB and PHONE
match because both are PHONE)
• both
QSO descriptions specify the same band.
• The QSO start date/time values are within 30 minutes of each
other (all times are UTC)
Required Fields
| Log Field | Example | Comments |
| QSO Start | 20030512 132620 | YYYYMMDD HHMMSS (Seconds not used) |
| CALL | VE3VRW | 13 characters or less |
| MODE | USB | One of: USB, LSB, PHONE, VOICE, SSB CW FM AM ASCI ASCII ATV CLO FAX GTOR HELL HFSK JT44 MFSK8 MFSK16 MTTY MT63 PAC PAC2 PAC3 PCW PKT PSK31 PSK BPSK,BPSK31 QPSK PSK63 PSK63F BPSK63 PSK125 PSK125F Q15 Q15X25 RTTY SSTV THRB TOR |
| FREQ | 14.240 | Decimal Megahertz |
Optional Fields
| Log Field | Example | Comments |
| RST Sent | 59 | 8 characters or less. |
| Comments | Free form text | 240 characters or less |

The Log Prefs allow you to choose which Log fields are displayed in the Log Panel.
The Report Prefs allow you to choose which Log fields are displayed in the Reports.
The
check boxes only affect which fields are displayed, the fields
are not removed from the log.
The WSJT-X Log ADIF check box will select UDP Log ADIF (12) rather than Log Binary (5) - only use Log Binary with WSJT-X, use ADIF with 3rd party FT8 clients.
The Use
Mode Groups check box determines if specific modes are
searched for (ie USB) or mode groups (ie all voice modes)
The Color Wells allow you to change the default colors for Confirmed, Un-Confirmed and Worked QSOs.
Select Detach Log WIndow from the Log Menu to display the Log in a separate window.
Attach Log WIndow will return the Log to the Log Panel.
The
Floating Detached Log Window check box in the
Log Preferences will set the detached window to float above
other windows.
Set your email address and Club Log password
in the Club Log Look Up Preferences.
The Club Log target call sign is the one you
have set in the Station Preferences.
Uploads will be marked in the QSO comments field if the Look Up / Club Log Preferences Show In comments check box is checked.
Real Time
In the Club Log Look Up Preferences check the Upload Logged QSOs in Real Time check box to upload each QSO as logged.
Under the Log Menu select Update Selected QSO in Club Log or in the Log Panel contextual menu select Update in Club Log.
Batch
Under the Log Menu select Upload Selected QSOs or in the Log Panel contextual menu select Upload to Club Log.
Uploads are optionally marked in the comments field of the QSO and can be un-marked with the Log Menu Change Selected Log Entries Remove Club Log Comments check box.
Note: If a QSO is flagged as Uploaded to Club Log, subsequent Uploads will skip this QSO. You can Update the QSO if it has been changed.
Make sure you do this with a copy of your log file named MacLoggerDX.sql placed
on your desktop…
The text in bold green is what you type into the Terminal app
Use the free App BBEdit to edit corrected.txt
We are going to:
1) Use the Terminal app to convert your sqlite log file to a text file.
2) Edit the text file with BBEdit.
3) Use the Terminal app to convert the edited text file back into a log file.
Using the Terminal app
cd ~/Desktop/
sqlite3 MacLoggerDX.sql
.output corrected.txt
.dump
.exit
Using BBEdit edit corrected.txt or If you rename corrected.txt to
corrected.csv then you can edit it in Numbers - make sure to export as CSV.
Using the Terminal app
sqlite3 corrected.sql
.read corrected.txt
.exit
When complete, the edited log file will be called corrected.sql and will be on your desktop.
Make sure you do this with a copy of your log file named MacLoggerDX.sql placed
on your desktop, the unlocked file will be created as MacLoggerDX_new.sql.
The text in bold green is what you type into the Terminal app
cd ~/Desktop/
echo ".dump" | sqlite3 MacLoggerDX.sql | sqlite3 MacLoggerDX_new.sql
Make sure you do this with a copy of your log file.
This SQL command will copy a substring of the comments column into the skcc column from the first character after SKCC: up to a count of 8…
update qso_table_v007 set skcc = substr(comments,6,8);
This SQL command will copy a substring of the comments column into the skcc column from the first character after SKCC: up to the comma…
update qso_table_v007 set skcc = substr(comments,6,instr(comments,',') - 6);
This SQL command will copy the contents of srx column into the skcc column…
update qso_table_v007 set skcc = srx;
You need to open the database, execute the SQL command and then write the changes.
Make sure you make a backup copy of your log file first.
cd $HOME/Documents/MLDX_Logs
sqlite3 MacLoggerDX.sql
delete from qso_table_v007 where pk IN (SELECT max(pk) FROM qso_table_v007 GROUP BY call,qso_start,tx_frequency HAVING COUNT(*) > 1);
.exit