
The DXClusters Panel is a complete Telnet client optimized for DXCluster traffic combined with a DX Spot interpreter.
A list of default DX Cluster nodes is loaded into the pop up list in the DXClusters button at the top right of the DXClusters panel. When an item from this pop up button is selected, MacLoggerDX attempts to start a Telnet session with the node. The Auto Connect check box, will connect you to the DXCluster at startup and if the connection is dropped for a reboot of the node etc.

The Telnet client in this panel can connect to any Telnet host but when connected to a Telnet DXCluster node it will allow you to automatically lookup and optionally tune to the spots being reported on the cluster.
In addition to the basic frequency, time, spotted call, and spotter's call included in the spot, there are also comments which MacLoggerDX can sometimes use to decode a QSX split, SOTA or IOTA reference. If there is a valid SOTA reference in the spot comments MacLoggerDX will fill in the spot's SOTA field and also geolocate the spot in latitude, longitude and Grid square. If there is a valid IOTA reference in the spot comments MacLoggerDX will fill in the spot's IOTA field. MacLoggerDX also does some geolocation on the spotted and the spotter's call signs and prefixes to determine grid references, bearing and distance as well as providing spotter's location filters. The Mode of the spotted QSO is inferred from the frequency of the spot and your Band Plan.
A list of default DX Cluster nodes is loaded into the pop up list in the DXClusters button. Many of the dxclusters are linked over the Internet and there is a good deal of similarity in traffic amongst the different dxclusters but you may want to choose one local to you, or customized for your interests. The Telnet DXCluster servers are all maintained by volunteers and if your can't connect to any particular dxcluster it may be offline for maintenance and you will want to try another one from the popup list. If you have Check for Updates enabled in the Station prefs this list will be updated to the working dxclusters reported by IW1QLH.
You can also use the Local filter to only show DX stations that were heard in your part of the world, increasing the likelihood that you will be able to hear them too.
The font of the Clusters and Spots displays can be changed by clicking on the text and then selecting Font/Show Fonts from the Edit menu. Note: Some fonts like Monaco do not have bold or italic variants. Menlo is a fixed-width font with stroked zeroes, bold and italic variants.
If you wish to customize this list, Look in the downloaded "Sample Files" folder and edit the dxclusters.dat file and place it in ~/Documents/MLDX_Logs and restart MacLoggerDX.
Each list item has the following format:
[Call sign]<sp>[URL, with an option port number preceded by a colon]
Example:
4Z5LZ-2 cqplanet.com:7300
The port number is only required if the node is operating on a different telnet port from the default (23).
When an item from this pop up button is selected, MacLoggerDX attempts to start a Telnet session with the node.
The Auto Connect check box, will connect you to the DXCluster at startup and if the connection is dropped for a reboot of the node etc.
Your Call Sign is automatically sent to the node, but once connected to the dxcluster you may type any command to the node to configure your dxcluster in the text entry window beneath the scrollable session window in the DXClusters/Cluster panel. Remember to check the command syntax for your particular dxcluster in their help files.

Note: The first time you connect to a cluster, you may be asked to supply your name, QTH, etc, (some DXClusters require these to be set before you can send dx spots). You can enter these settings here (e.g. set/name Don or set/qth Toronto). These settings should automatically propagate through the network to other dxclusters.
If you are having trouble connecting to a DXCluster you can use NetCat in a Terminal window as a network reachability test (if the macOS Terminal application can't reach the telnet DXCluster then MacLoggerDX won't be able to either)

You may also select a command from the Commands pop up button. If you wish to customize this list, Look in the downloaded "Sample Files" folder and edit the dxcommands.dat file and place it in ~/Documents/MLDX_Logs and restart MacLoggerDX.
If you select Auto Tune, MacLoggerDX will automatically attempt to tune your radio to the frequency and mode of each filtered DX Spot as it is received. If you have the Schedules enabled, it will take over the radio after a short interval. If you want to stay with the DX Spot frequency, simply disable the schedules from the Shortcuts menu or disable the Schedules Enabled check box in the Schedules Panel untill you want to return to your schedule.
If you
select Auto Lookup, the filtered DX Spots will
automatically be looked up in MacLoggerDX's internal databases
and your log files, and Call Book option. This data will be
loaded into the edit fields of the DX/Contest Panels, ready to
log, and the Map Panels will be centered about the location of
the spot. The Spot will also be displayed in the Bands
Panel. MacLogger DX will also attempt to calculate distance and
bearing information. This information will only be as accurate
as the information stored in MacLoggerDX's data bases and
optional online Call Books.
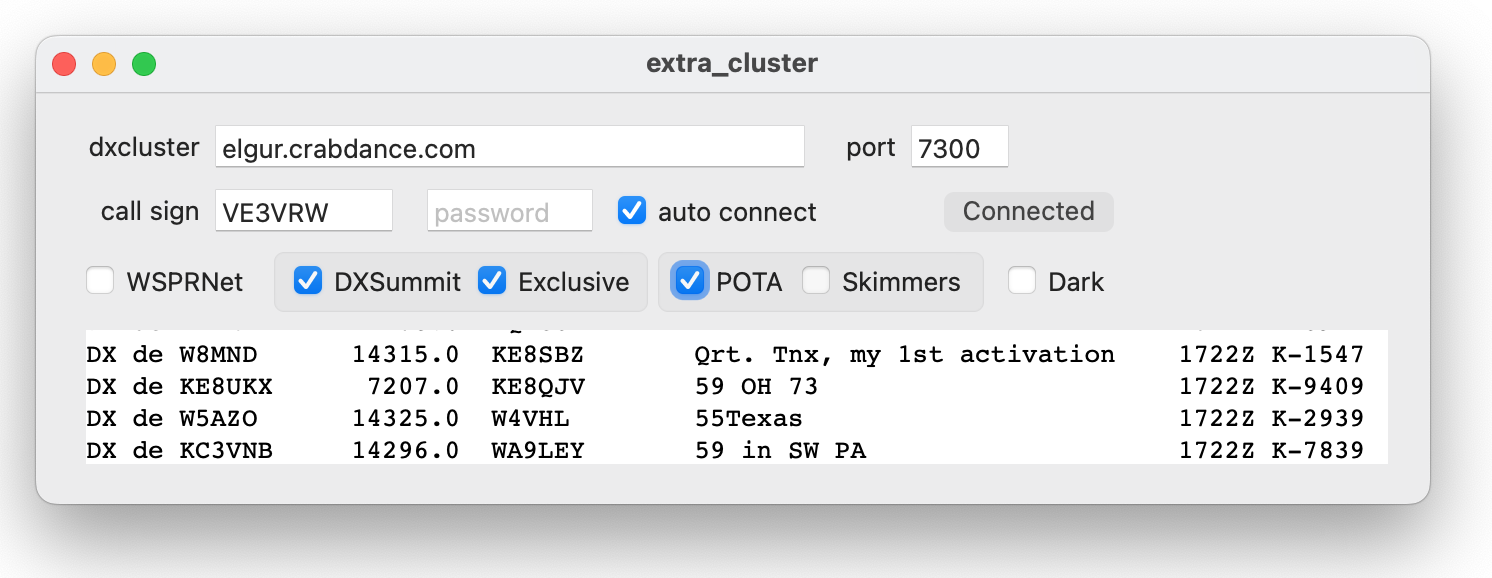
The extra_cluster application delivered in the
MacLoggerDX.dmg Extras folder (and available here)
adds an extra dxcluster source to MacLoggerDX which will merge
the extra_cluster spots with the ones from the dxcluster
selected in MacLoggerDX. Spots from extra_cluster will display
the DX de field in Brown
in the Spots panel. The dxlcuster source can
be set to any working dxcluster. The WSPRNet, DXSummit and POTA
check boxes will add spots from those web sources.
The Commands popup button is loaded with a default list of DX Cluster commands or you can edit the sample dxcommands.dat file and place it in ~/Documents/MLDX_Logs/. You may also type any command to the node to configure your dxcluster in the text entry window beneath the scrollable session window in the DXClusters/Cluster panel.
The command syntax varies somewhat depending on what software the cluster you have connected to is running.
Pressing the Spot Button will bring up a spot window that will allow you to compose and send a spot to the connected cluster. The spotted Call Sign will be the one you have in the DX or Contest Panel Call Sign field. The frequency will be the one displayed in the DX or Contest Panel. Comments are optional and can be added before you send the spot. If you need to do a test spot , Look up the call TE1ST. That is a reserved call that will not be sent throughout the network. It will be echoed back to you for confirmation (as with all dxcluster command syntax - check with your dxcluster help files to verify implementation details for your dxcluster).
Colour Codes (Cluster Panel)
The Log prefs allow you to change the default colors for Confirmed, Un-Confirmed and Worked spots. The color codes are applied to the Spots Panel dynamically and you can see the effect of changing the Show Bands by DXCC Lookup Pref check box immediately while the color codes in the Clusters Panel are applied only at the moment that the spot is received or re-received with the sh/fdx command.
Suspended Auto-Scrolling
The Cluster, Spots and History Panels all suspend auto-scrolling when something is selected - so that you can read them (otherwise hard or impossible to do on a busy contest day).
This puts the control over auto-scrolling in your hands.
When
a line is selected and Auto-scrolling is disabled a small
indicator light will flash red at the top left of the scrolling
area in that panel. Pressing this button will deselect the line
and Auto-Scrolling will resume. The selected spot will be kept
within the Spots panel view if you hold down the Shift key.
During periods of high spot traffic a certain amount of scrolling is unavoidable due to duplicate and aged spots being deleted but we do not delete a spot if it is selected.
To de-select the line and re-enable auto-scrolling: click on the indicator light or click on the Cluster Panel line or command-click on the History or Spots Panel selected line.
The Suspend Auto-Scrolling option can be turned off for the Spots Panel in the Clusters Prefs.
WWV
Some dxclusters can display WWV solar propagation indices in response to the show/wwv command sent to the node. These reports are displayed in the WWV Panel which can be opened from the MacLoggerDX Menu, or the Refresh WWV Shortcuts menu.

The DXClusters Panel is divided into two sub-panels, the
raw telnet feed Cluster Panel and the filtered/processed
Spots panel.
The Cluster Panel displays the actual Telnet session dialog in it's entirety without local client filtering.

Mouse Clicks
The list of spots will automatically scroll to the last spot received unless any text in the display window is selected. To resume auto-scrolling de-select all with a single click in the display area.
A Single click on a dxcluster spot (or the auto-scrolling indicator) will cancel any selected spots and resume auto-scrolling if a selection has suspended it.
Double clicking on a dxcluster spot will select the word and suspend auto-scrolling.
Triple clicking on a dxcluster spot will select the line, suspend auto-scrolling, look up and display the spot, tune the radio to the spot's frequency and mode and if Auto Rotate Beam is enabled in the Rotor Prefs, swing the beam around to the spot's location. (Double-clicking on a WSJT-X CQ spot will create a Reply in WSJT-X instead of rotating the beam).
The band and mode filter check boxes will include (filter) spots from each band and mode in the Spots List and for Auto Tune and Auto Lookup.
The Local filter check box will filter out spots where the DX de spotter is more than the distance set in the Clusters Prefs from your QTH.
The first spot in the list will be your station call, time-stamped with your session start time. This spot is not reported to any dxcluster, it's just there for your reference.
If you hold down the Command key while clicking any of the band check boxes on or off - all the band check boxes will turn on or off accordingly.

The Search Field will allow you to search the filtered spots by Call Sign, Name, DX de Spotter, DXCC Country, State, IOTA, SOTA, POTA, Grid or Comments. Entering Unconfirmed or just unco in DXCC Country, State or Grid will show only spots which are unconfirmed on DXCC, US State or Grid. Lookup, log and Alarm spots will always display no matter what the search criteria set unless you remove them with the Shortcuts menu Remove Lookup Spots or Hide Spot Alarms commands.
Columns
The
Spots Panel works with or without Auto
Lookup enabled but the Grid may be
less accurate without Auto Lookup and the Name
field may be missing (depending on caching). Because DXClusters
transmit the spotted station's frequency not the mode,
MacLoggerDX uses your Band plan to determine the mode the QSO is
in and may not reflect the actual Mode in use.
The Worked field displays the bands you have
worked the station on. Where MacLoggerDX can parse comment
fields with QSX 14100.0, UP 3,
DWN 2, DOWN 5 etc. split spot
frequencies will show in italics in the Frequency
column. The parser is reasonably accurate and handles the
majority of cases but the syntax for reporting QSX in the
comments field of a dxcluster spot is far from standardized so
some false positives/negatives or bad QSX values may occur.
The DX de column will display the call sign of the dxcluster spotter, in the case of local WSJT-X spots it will show your call sign, Lookup in the case of manual lookups, and Log in the case of logged QSO displays. Lookup and Log spots can be removed with the Shortcuts menu Remove Lookup Spots command. Individual spots can be removed with the contextual menu (right-click) Delete Spot command.
The data can be sorted by clicking in the column heading. The column sorted by is highlighted or checked (This setting is saved in your preferences). Clicking on it a second time will reverse the order of the sort. Dragging column headings will allow you to rearrange their order. (column order is saved in your preferences). You can make the column wider by dragging the column header vertical margins, double-click the line between any two column headers and the column’s width will be automatically set. The Clusters preferences Spots panel column check boxes allow you to choose which columns are displayed.
By default the sort order will revert to historical (UTC) when you start MacLoggerDX, but you can change this to persist your chosen sort order between sessions with the Terminal command $ defaults write com.dogparksoftware.MacLoggerDX persist_spots_order -bool YES.
If your radio is connected and tuned to within 1 kHz of any of the spots in the list, the Frequency value will be shown in bold. The Band Value is shown in bold if the radio is connected and tuned to that band.
Mouse Over
Holding the mouse pointer over some columns will give additional information about that column. For example the time stamp mouse-over will tell you the local time for the spot's location as well as time to sunrise/sunset. Holding the mouse pointer over the IOTA, SOTA or POTA columns will display a Tool Tip for that entity showing it's name.
Mouse Clicks
Double clicking on a spot will look up and display the spot, tune the radio to the spot's frequency and mode (Double-clicking on a WSJT-X CQ spot will create a Reply in WSJT-X instead of tuning the radio) and if Auto Rotate Beam is enabled in the Rotor Prefs, swing the beam around to the spot's location (Double-clicking on a WSJT-X CQ spot will create a Reply in WSJT-X instead of rotating the beam). Depending on your radio you may want to tune the frequency first since some radios will lose the mode when the band is changed. In the Radio prefs un-check the Auto Tune Mode First check box to tune the frequency (band) first. The Radio prefs Split Delay will also determine what duration to pause between the frequency and mode Radio commands (If the number is too low the mode may be set incorrectly).
Double clicking on the Flag or QSL Image portion of the entry will display the Flag or QSL Image full size in it's own window.
Command clicking on a selected line (or clicking on the auto-scrolling indicator) will de-select the line and re-enable auto-scrolling.
Control clicking (or right-clicking) on a selected line will bring up a Contextual Menu.
Contextual Menu (control/right-click)

Skimmers and Contests (high spot
volume)
Skimmer spots from the reverse beacon network are a powerful tool to see band conditions in near real time. Some dxclusters will have commands to turn skimmer spots on and off. During a contest skimmer spots can come in at a rate greater than 20 per second. Without some tuning this can overwhelm MacLoggerDX's ability to process these spots. Contests can also result in high spot volumes even without skimmers. This can make keeping some spots in view on the display difficult. Here are some things to adjust to lower the volume to a manageable rate:
Skimmer
spots (unlike most ordinary cluster spots) contain mode
information - CW, RTTY, PSK31 etc. MacLoggerDX uses this mode
instead of a band plan lookup and the mode is displayed in italics
in the Spots Panel.
If your radio does not support that particular native mode
MacLoggerDX will attempt to do a reverse lookup in the Mode
Mapping database.
For example if you have mapped the native radio mode FSK
to the common mode RTTY MacLoggerDX will set
your radio mode to FSK for a skimmer with a RTTY
common mode.
The Spots Panel Band and Mode columns color coding will tell you whether or not you have a specific call or dxcc country worked/confirmed on the spotted band or in the spotted mode independently. You can instantly see color coded status - worked(Brown) / confirmed(Green) / needed (Red) by Call sign, by DXCC, by Band, by Grid, by Mode, by State, by IOTA, by SOTA, by POTA, by SKCC, by Continent. If the Call is an exception to the normal prefix rules the DXCC Country will be shown in italics.
Worked/confirmed color coding and alarms.
http://groups.yahoo.com/group/macloggerdx/message/5074
Version 5.41 added worked/confirmed status to the color coding and alarm criteria as well as harmonizing the color codes in the DX, Spots, DXCluster and History Panels.
The DX Panel color coding will now give you the worked/confirmed status for every call, dxcc, mode, band grid, IOTA, CQ Zone and ITU.
The Spots Panel Worked column in the Spots Panel refers to the Call. The Band, Mode and DXCC Worked columns refer to the DXCC. The Call column will show the worked/confirmed status of the call spotted. (If you hold the mouse over those columns the tool tip will tell you what the column is color coded by - call dxcc)
If the Band column in the Spots Panel is red then you will know that you don't have the spotted DXCC country on the spotted band.
If the Mode column in the Spots Panel is red then you will know that you don't have the spotted DXCC country in the spotted mode.
The Check by Band and Check by Mode check boxes in the Alarms Prefs will determine which spots raise an alarm based on whether or not you have a specific dxcc country worked/confirmed on the spotted band and in the spotted mode in a single QSO.
The DX Panel Band and Mode fields color coding will tell you whether or not you have a specific dxcc country worked/confirmed on the spotted band or in the spotted mode in a single QSO (The Use Mode Groups check box in the Log prefs will determine if mode groups like Voice are used or individual modes like USB for the match).
The Spots Panel Band and Mode columns color coding will tell you whether or not you have a specific dxcc country worked/confirmed on the spotted band or in the spotted mode independently.
For example if the Mode is green and the Band is red it means you have confirmed that mode for that dxcc but you don't have that dxcc worked on that band at all.
The DXClusters/Cluster and History Panels color coding refers to the spotted DXCC entity.
• Brown - Worked but Not Confirmed.
• Green - Worked and Confirmed.
• Red - Not Worked.
• Blue - Manual Lookups (Spots and History Panels).

The Strip Call Sign Prefix check box will remove any suffix or prefix in your call sign when logging into the dxcluster (you may want to include the prefix if you are working portable and want your spots to be identified by the portable prefix).
The Auto Lookup Skimmer Spots check box will lookup skimmer spots as well as regular dxcluster spots if Auto Lookup is enabled in the DXClusters Panel.
The Age DX Spots popup sets the number of hours after which a DX Spot is aged off of the display. Spots are saved when you quit MacLoggerDX and restored the next time the application is run.
The Age History popup sets the number of hours after which a History panel Spot is aged off of the History display. History Spots are saved when you quit MacLoggerDX and restored the next time the application is run.
The DXCluster password text field may be required for some DXClusters, contact your DXCluster sysop or check the DXCluster help file.
The Suspend Scrolling check box can be used to turn on/off the Suspend Auto-Scrolling option.
The Age Lookup Spots check box will age off the Lookup spots at the same rate as the DX cluster spots. Lookup spots can also be removed at any time with Remove Lookup Spots in the Shortcuts Menu.
The Refresh WWV check box can be used to turn on/off the auto refresh of the WWV propagation window.
The dogparkSDR Spots check box will supply filtered DXCluster spots to dogparkSDR, the Mac FlexRadio client for display on it's Panadapter.
The
SunSDR Radio Spots check box will supply
filtered DXCluster spots to the SunSDR TCI server for display in
the ExpertSDR2 application.
Enable the Show Spots check box in ExpertSDR2
Options / Display / Spectrum.
The SmartSDR Radio Spots check box will supply filtered DXCluster spots to the FlexRadio server for display on other FlexRadio clients.
The Worked and QSL R filter check boxes (in the Clusters Prefs) will filter spots based on the DXCC Worked and Confirmed status by band in your Log.
The Follow
check box will set the Band filter check boxes to follow the
Band your radio is tuned to.
The Reject Specific Calls check box will filter out spot calls, spotters, DXCC countries or spot frequencies (MHz) entered in a comma delimited list. Note: when you are finished editing the list, tab out or press return to save it.
The Only
WSJT-X CQ Spots check box will limit the spots
to CQ only.
The Reject
Duplicate Calls check box will replace older spots
with newer spots if the call sign is the same, unless the status
has changed.
The Reject
Calls Worked Today check box will reject (filter out)
spots where the call sign, band and mode are the same as a QSO
worked in the last 24 hours - used where you don’t want to see
spots for stations that you have just worked.
The Local
Filter text box will set the distance at which
the Local check box filters out spots where
the DX de spotter is more than this distance from your QTH.
The Spots
panel column check boxes allow you to choose which
columns are displayed.